本文將說明如何在CentOS linux上安裝著名的開放源始碼入侵偵測/防止系統--snort。
1. 安裝所需要的軟體套件
2. 安裝並設定 mysql
(1) 新增 epel yum 資料庫
由於安裝snort所需要的軟體套件,原始的Centos資料庫並沒有支援,所以您需要新增 epel 的yum 資料庫。
# rpm -Uvh http://download.fedora.redhat.com/pub/epel/6/i386/epel-release-6-5.noarch.rpm rpm -Uvh http://download.fedora.redhat.com/pub/epel/6/x86_64/epel-release-6-5.noarch.rpm
(2) 安裝snort所需要的軟體套件
snort 需要的依賴性軟體為 gcc,make, rpm-build,autoconf,automake,flex,libpcap-devel,bison,libdnet, libdnet-devel, mysql-devel, pcre-devel, php-mysql ,不過許多軟體在預設安裝時就已經安裝了,所以經 rpm檢查之後,針對還需要安裝的軟體進行安裝可。
# yum --enablerepo=epel -y install libpcap-devel libdnet libdnet-devel pcre-devel
(3) 下載安裝 daq 源始碼套件並編譯安裝之
| (a). 到snort官方網站下載最新版本的 daq 原始碼 (如本例的 daq-0.6.2-1.src.rpm) (b). # rpm daq-0.6.2-1.src.rpm (c). # cd rpmbuild/SPECS (d) # sed -i 's/\/lib\//\/lib64\//g' daq.spec (e) rpmbuild -bb daq.spec (f) # rpm -Uvh ../RPMS/x86_64/daq-0.6.2-1.x86_64.rpm |
(4) 下載最新的snort原始碼並編譯安裝
| (a) 請到snort官方網站下載最新版本的Snort 原始碼(如本範例的 snort-2.9.2.1-1.src.rpm) (b) 安裝 snort原始碼 [root@nm ~]# rpm -Uvh snort-2.9.2.1-1.src.rpm 1:snort ########################################### [100%] (c) 編輯 snort.spec # vi snort.spec 在大約第280行處,新增紅色那三行: SNORT_BASE_CONFIG="--prefix=%{_prefix} \ (d) 建立 64位元的mysql程式庫目錄符號連結 # ln -s /usr/lib64/mysql /usr/lib/mysql (e) 編譯連結 snort # rpmbuild -bb --with mysql snort.spec 一旦編譯成功將會產生 ../RPMS/x86_64/snort-2.9.2.1-1.x86_64.rpm ../RPMS/x86_64/snort-mysql-2.9.2.1-1.x86_64.rpm 二個檔案 (f) 由編譯出來所打包的rpm檔安裝 snort和snort-mysql [root@nm x86_64]# cd ../RPMS/x86_64
|
(5) 建立 snort 資料庫
| [root@nm ~]# mysql -u root -p Enter password: Welcome to the MySQL monitor. Commands end with ; or \g. Your MySQL connection id is 2987 Server version: 5.1.52 Source distribution Copyright (c) 2000, 2010, Oracle and/or its affiliates. All rights reserved. Type 'help;' or '\h' for help. Type '\c' to clear the current input statement. mysql> create database snort; mysql> grant all privileges on snort.* to snort@localhost identified by 'snort'; mysql> flush privileges; mysql> exit
|
(6) 設定 snort
| 編輯 snort 組態檔 (/etc/snort/snort.conf ) # vi /etc/snort/snort.conf
ipvar HOME_NET 192.168.2.0/24 #226行左右: 將下列一行註解掉 # dynamicdetection directory /usr/local/lib/snort_dynamicrules # 484行左右: 新增一行資料庫相關設定 #請在 89行後面加上底下四行 (SIP_PORTS之後) # List of file data ports for file inspection
[root@www ~]# vi /etc/sysconfig/snort # 69行左右:將底下一行註解掉 ( output logs into MySQL ) # ALERTMODE=fast
# 第4行左右: 變更如下 ( 移除不必要的目錄 ) /var/log/snort/alert /var/log/snort/*log {
|
(7) 註冊並下載規則檔案
先至snort網路註冊一個帳戶並登入後可下載最新的規則檔 (本例為 snortrules-snapshot-2920.tar.gz)
請使用 tar 將規則檔案解壓縮到 /etc/snort 目錄下
# tar zxvf snortrules*.tar.gz -C /etc/snort
(8) 啟動 snort
# service snortd start
(9) 安裝 BASE (Basic Analysis and Security Engine)
BASE 提供網頁式的前端以便讓管理員可以直接以瀏覽器檢視及分析來自 snort IDS的警示,
# yum --enablerepo=epel -y install php-adodb php-pear-Image-Graph
# tar zxvf base-1.4.5.tar.gz
# mv base-1.4.5 /var/www/base
# chown -R apache. /var/www/base
# cp /var/www/base/base_conf.php.dist /var/www/base/base_conf.php
# vi /var/www/base/base_conf.php
# line 50: PATH to BASE $BASE_urlpath = '/base'; # line 80: PATH to adodb $DBlib_path = '/usr/share/php/adodb'; # line 102: change for your env # snort database $alert_dbname = 'snort'; # username for snort database $alert_user = 'snort'; # DB password for snort $alert_password = 'mydbpassword';
|
# vi /etc/httpd/conf.d/base.conf (如果不存在請新增)
| Alias /base /var/www/base <Directory /var/www/base/> Order Deny,Allow Deny from all Allow from 127.0.0.1 192.168.2 </Directory> |
# service httpd restart (重啟動 httpd)
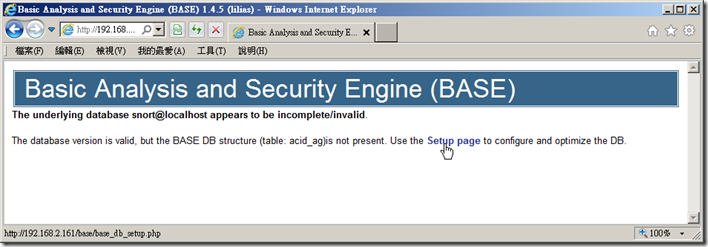
(10) 存取 Base 網頁 (http://server/base/)並做初始設定
請按 『Setup page』連結
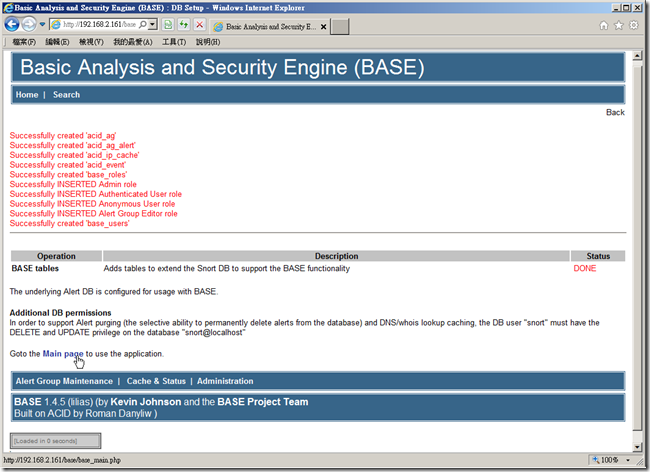
接下來,請按一下『Create BASE AG』連結以新增支援BASE功能的資料庫表格

一旦完成設定按下方的『Main page』以回到Base的首頁
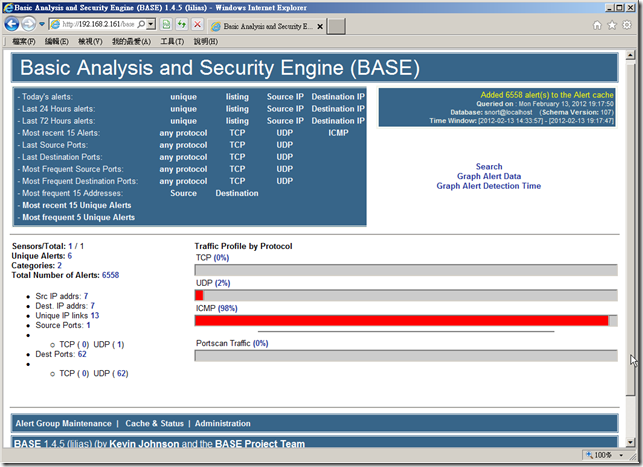
下圖即為Snort的BASE首頁,您可以開始檢視Snort入侵偵測記錄